Monday, December 27, 2010
Concord Crush Christmas Card
Sunday, December 26, 2010
SNOW!!!!
Sunday, October 24, 2010
Simply Christmas – Part 2

Saturday October 30th 10am-noon
Saturday October 30th 7pm – 9pm
Pre-pay by Thursday October 28, and I will make this box for your cards. FREE!
Wednesday, October 13, 2010
September’s Club Projects
If you would like detailed printed directions for these projects, please let me know! My next club meetings are Friday evening, October 15th, Sunday afternoon October 17th, Tuesday October 19th (morning and evening sessions) and Thursday morning, October 21st . If you have never been to one of my stamp club meetings, the first visit is FREE!!!! This is a great way to check it out before deciding whether to join. Repeat visitors pay only $7 or place a $15 minimum order. Contact me for more information and to let me know if you would like to come to one the October meetings.
Wednesday, September 15, 2010
Simply Christmas
Wednesday, August 25, 2010
A New Blog Name for the “New (School) Year”
Here are the projects we made in Stamp Club this month.
Sunday, July 25, 2010
New Colors!
This card uses all five of the new “In Colors.”

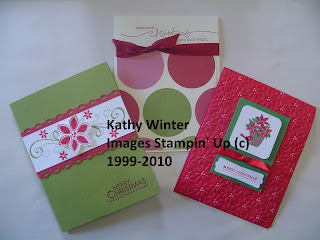
These cards were made using Cherry Cobbler cardstock and ink. I wanted to show how to make a Christmas card using a non-Christmas stamp set – “Elements of Style.” (I did have to borrow a stamp from another set for the greeting.)

These cards were made using Early Espresso, Cajun Craze, and Daffodil Delight. Everyone thought these colors would be great for making cards this fall.

This is a corner bookmark using Marina Mist and Crumb Cake. Here it is in use……marking the spot in the 2011-2012 Idea Book & Catalog where you can purchase the “Lovely Letters” stamp set.


Thanks to everyone who stopped by over the weekend. I hope you enjoyed making your projects with the new colors.
Thursday, July 1, 2010
Happy New Year!
This is an invitation I made to send to some of my friends who haven’t had a chance to get in on all the fun of my clubs, classes, and workshops. This is one of the projects we will be making in my June club meetings. If you would like more info on my clubs, come “Get the Scoop” on the 17th or 18th.
Saturday, June 26, 2010
Presto Papers

These cards were made using the Presto Patterns Specialty designer series paper, available in the current mini catalog. The paper comes white - with watermark images on it. When you add ink to the paper, the watermark area stays white and the rest of the paper takes the color of the ink you choose. I used a brayer to put ink on the paper, but you could also use a sponge, sponge dauber, or the new “Smooch Spritz” sprays. For the pink card, I used a sponge dauber to rub ink onto Whisper White organza ribbon. This is a great way to get ribbon to match any card!
Monday, June 21, 2010
Happy Father’s Day – a day late!

Friday, June 18, 2010
A Little Black Magic

At our June stamp club meeting, I demonstrated the Black Magic technique. HERE is a good video that explains how this is done. Basically, you stamp your image on black cardstock using white craft ink. Use the embossing tool to dry the ink, or set it aside to dry naturally. Once the ink is dry, you can color the image using water color pencils. Then add highlights with a white gel pen. I challenged my stamp club members to design a card using their stamped/colored image. Can’t wait to see what they come up with!
Wednesday, June 2, 2010
Last Chance Lists
Click HERE to view the list of retiring stamp sets.
Click HERE to view the list of retiring Décor Items
The retiring stamp sets and the retiring Décor Items will be available through June 30th.
Visit my Stampin’ Up website HERE for the updated list of retiring accessories (ink, cardstock, ribbon, etc…) These items are limited in quantity and are only available while supplies last. Many items are expected to sell out quickly. You can place an online order 24/7, or I will be placing an order on June 5th, if you would like to save a little on shipping and handling costs. Just email or call me with your order by 11pm Friday June 4th. (Some of the items may sell out before then, so if there is something you really want, then I would suggest ordering it online.)
Many of these accessory items are 25-50% off, so stock up on your stamping and scrapbooking supplies for those summer projects!
Let me know if you have any questions! The new 2010-2011 Idea Book and Catalog will be out on July 1st! Ask me how to get yours for FREE!!!!
Saturday, May 8, 2010
5th Avenue Floral One Sheet Wonder Workshop

Option #1: $15 to make 10 cards and a tote (card box)
Option #2: $40 for the class and Fifth Avenue Floral Stamp set to keep
Option #3: $65 for the stamp set, 3 ink pads, 24 sheets of colored cardstock, 20 sheets of white cardstock, 40 envelopes, and SNAIL adhesive (and the class is FREE)
Space is limited, register by May 16th!
See left sidebar to register NOW!
Sunday, April 11, 2010
Color Renovation
Some former In Colors are coming back as part of the new core collections, and 5 brand new colors are being introduced.

All this will happen in July, with the new Idea Book & Catalog. There will also be 5 new In Colors, which will be available for two full years, instead of the current one year.
I must admit, that at first, I was shocked at the announcement, and somewhat disappointed that they decided to make this change………..especially since I was gradually purchasing all the colors of cardstock, and have almost completed my collection!
But after listening to the information presented to us on the demonstrator website, and reading other blogs for opinions………..I am excited about the change. Most of my favorite colors are sticking around, many of the retiring colors I NEVER used, a few of my favorite In Colors from the past are becoming part of the new collection, and most of all, if I understand correctly, the new catalog will have more accessories that coordinate will the cardstock colors! Yeah! I think I avoided using certain colors because there wasn’t ribbon to match the ink and cardstock.
I think the best analogy I have heard about the color change is to think about when you are shopping. Isn’t it fun to see all the new colors used in clothing, purses, make-up, and even cars? Wouldn’t it be dull and boring if we wore the same colors of clothing year after year after year?!
And - have you ever had a product that you really loved, suddenly disappear from the shelves because it was discontinued? Wouldn’t you have bought extras, if only you knew ahead of time it would no longer be available? With this announcement by Stampin’ Up, we have time to stock up on our favorite colors before they are gone.
This Color Renovation may be overwhelming at first, but just like a renovation to your home, the end result is something beautiful and you are happy with the results and glad you did it!
I am looking forward to the next few months – trying to use up that stash of cardstock I have been purchasing! Contact me if you would like to get together with your friends and help me! Keep checking my blog and Stampin’ Up website for future class offerings!
Wednesday, April 7, 2010
February Stamp Club Projects
The first card we made in our February club meeting was this card.

My upline, Susan Elise, demonstrated how to make this card at one of our meetings. It is super easy to make this beautiful card using a brayer, the Elegant Bouquet Impressions Folder, and the Big Shot Die Cutting Machine.
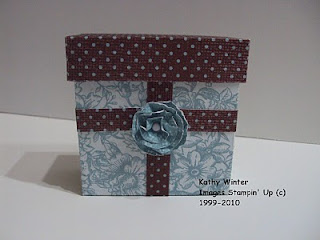
Then each of my club members made a little box like this for holding 3x3 cards.

We used retired Designer Series Specialty paper. The specialty paper is cardstock weight, and perfect for making cute boxes. The little flower on the front of the box was made with several circle punches. I plan on giving my club members a 3x3 card with their club order each month. They can keep them in the box, until they have an occasion to use the card.
Finally we made this 3x3 card and 6x6 page showing how to make the little lamb.
My stamp clubs are a great way to learn new techniques, and have a fun afternoon/evening out. Contact me for more information about joining!
Monday, March 22, 2010
The Power of a Handmade Card!

Well, Thursday night was our third Brownie meeting, and 5 out of the 6 girls that received this card, attended the meeting and signed up to join the troop! Even though there was nothing fancy about this card, I know it was the card and handwritten note inside that made the difference. The parents all mentioned how excited the girls were to receive something in the mail.
So you see, a handmade card really does make someone feel special. I am going to TRY and actually send the cards I make, instead of hoarding them! Thanks for looking. Now go make a card for someone and SEND IT!!!
Saturday, March 20, 2010
March Stamp Club 3D Project

This is the 3D item we made at stamp club this month. I saw this idea
back in February. I kept seeing the same idea on other blogs. You can make this using any size of paper. Then I saw where someone added a handle, making it into a cute Easter basket. I thought it would make a cute favor for the Easter dinner table. Thanks for looking!
Thursday, March 18, 2010
March Stamp Club Projects

Saturday, February 20, 2010
January Stamp Club Project
Friday, February 5, 2010
More SOUP-er Stampin' Projects


Sunday, January 31, 2010
“SOUP”er Stampin’ Projects


Friday, January 29, 2010
SOUPer Sunday Stamping!
- Come when you can between the hours of noon and 6pm.
- Bring a friend!
- Make a different project each hour for FREE!
- Take a break for a yummy bowl of home made soup (Get it......"Soup"er Bowl Sunday!)
- See what's new with Stampin' Up, including clear mounted stamps, new punch design, simply adorned jewelry, new decor elements (vinyl clings for decorating your wall), and more!
PLUS, it's SALE-A-BRATION, an annual Stampin' Up Promotion, where for each $50 purchase you make, you earn a FREE stamp set or other exclusive merchandise. Look at what you can get free HERE.
From now until February 28, 2010, if you purchase the I {Heart} Hearts stamp set, Stampin' Up will donate $2 to the American Red Cross' Haiti Relief and Development Fund. More Info HERE.
In addition, I am donating 10% of all sales (from now through Feb. 28) to the same charity.
If you can't attend on Sunday, and would like to make a purchase, please call or email me by Monday, February 8th. Or, you can order online 24/7 at http://kathywinter.stampinup.net
Hope to see you on the 7th. Please let me know when you will be stopping by (and how many friends you are bringing) so that I can have enough projects prepared. Check back later this weekend to see some of the projects you can make for FREE!
Wednesday, January 20, 2010
Valentine Treats


