Thursday, November 28, 2013

Happy Thanksgiving

I hope you are able to spend today with your family and/or friends.  We will have a quiet Thanksgiving at our house, since we have no extended family members living close to us.  In past years either my job or my husband's job often kept us from traveling the 8 or 14 hours to visit my/his family.  But this year it is my daughter who has to work later today at her retail job.

This is one of the cards we made at my November Stamp Club meetings.  We used the stamp set Gently Falling which uses the two step stamping technique.  This was going to be a lesson in using the stamp-a-ma-jig, but then I decided that it was better if the images did NOT line up perfectly.

While everyone was stamping the strip to make their card, they also stamped a half sheet of ivory card stock using the same leaf images.  Then they chose two pieces of coordinating cards stock.  Their homework is to make a card using those supplies.  I can hardly wait until next month to see what they will make!

CONTACT ME if you would like more information about my stamp clubs.

CLICK HERE to RSVP to a stamp club meeting.  Join in the fun and make at least two cards and one "3D" project each month.

Only a few more days to save up to 50% on Stamping Up! products.  CLICK HERE to see what's on sale, through December 2.

Thanks for stopping by!
Kathy

Tuesday, November 26, 2013

November Club 3D Project


This is a cute box that we made at all of my November Stamp Club meetings.  It is big enough to hold quite a few cards - right at your fingertips.  I suggested that my club members go through their stash of cards and choose the ones that they can mail out during the month, and keep them in this box (ready to mail!)  I think I should take my own advice.  I am TERRIBLE about getting cards mailed out on time - if I even mail them out at all!

My box is made with Island Indigo card stock and Venetian Romance Designer Series Paper.

CONTACT ME if you would like the directions for making this box.

The HOLIDAY SALE continues through December 2.
When shopping online, please use the hostess code, RGVTJ2HP (valid through November 30 2013)

Thanks for stopping by today!
Kathy

Monday, November 25, 2013

One Month Until Christmas

Only one month until Christmas!  I started preparing you back in January to get a start on your Christmas cards!!!  CLICK HERE to see the cards I was working on then.  Today I will show you three quick and easy cards in case you would like to make your cards this year, but haven't started yet.  These are cards that I helped the Girl Scouts make earlier this month.  The card above uses a retired stamp set - but you could make this card using almost any image you may have.
 This is another quick and easy card to make, and a great way to use up those extra scraps of Designer Series Paper.  You may not be able to see that after the DSP was adhered to the green card stock, the entire piece was embossed using the Big Shot and the Lattice Embossing Folder.  The Greeting on this card is from the stamp set, Tags for You and is punched out using the Label Bracket Punch.  These products are in the Holiday Catalog and can be bundled together at a 15% savings.
This card takes a little more work, but it is still easy to make using the Mosaic Madness stamp set from the Annual Catalog.  Again, you can bundle the stamp set and coordinating Mosaic Punch to save 15%.  Can you see that the large white card stock piece is embossed using the Big Shot and the Modern Mosaic embossing folder?  The greeting is from the Sweet Essentials stamp set, found in Stampin' Up!'s annual catalog.

CONTACT ME if you need more information about making these cards, or if you would like help with placing your order.

VISIT MY STAMPIN' UP! WEBSITE to shop 24/7.  When placing an online order this monthe (November 2013) please use the hostess code RGVTJ2HP.

Don't forget about the HOLIDAYSALE - lots of products up to 50% off!  
Thanks for stopping by today!
Kathy

Tuesday, November 19, 2013

Two BIg Announcements!


The first big announcement is..............Wednesday November 20 is the first day of Stampin' Up!'s holiday sale.  There are lots of fabulous products on sale up to 50% off!  You can CLICK HERE to view a list of  products that will be on sale.

The follow items are on sale for 30% off November 20 only! 

Stampin' Trimmer (#126889) reg $29.97 on sale for $20.97

Simply Scored Diagonal Plate (#125586) reg $11.95 on sale for $8.37

Many Marvelous Markers (#131264) reg $109.95 on sale for $76.97

CLICK HERE TO GO TO MY STAMPIN' UP! WEBSITE to place your order.  If you choose to order online, please enter the hostess code: RGVTJ2HP.  Online orders of at least $35 and using the hostess code will receive a $5 gift certificate from me for a future purchase!

Local customers should CONTACT ME to place your order and I will add $5 to your hostess rewards when you decide to cash them in - if your order is $35 or more.  You must print a copy of this blog post as your "coupon" to receive the $5 bonus rewards.  I am testing you to see if you actually read my blog!!!!


And now for the second big announcement!  The winner of the blog candy from FRIDAY'S BLOG HOP POST is Diane Black!  I used random.org to choose the winner.  Congratulations, Diane!  Thanks for visiting my blog and leaving your nice comment!

Thanks for stopping by today!  I will be posting this month's club projects and my club member's homework projects soon.  So please come back for another visit.

Kathy

Friday, November 15, 2013

Blog Hop with a Little Blog Candy!


I am so excited to be participating in the Simply INKcredible Sisters Holiday Blog Hop!  We will be focusing on Christmas projects.   You may have arrived here from Dawn Duval's blog, or maybe you are one of my followers who came here today for your occasional dose of inspiration.  If you should get lost along the way, click on the links below to get back on the hop.  Have fun!
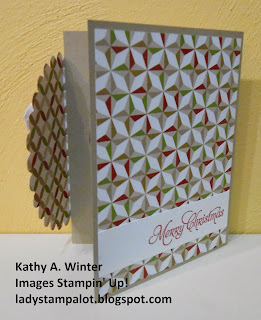
 My first project is what I call a Backwards Card.  Below is what it looks like as you  begin to open it....
 And then here is what it looks like on the inside.  There is plenty of room to write a personal message, or to attach a photograph.
Supplies used to make this card:
Stamp Sets:  Ornament Keepsakes, More Merry Messages (These sets are NOT in the annual catalog, but they ARE still available for purchase.)
Card stock: Crumb Cake, Cherry Cobbler, Whisper White
Ink: Cherry Cobbler, Old Olive
Designer Series Paper: Season of Style
Other: Big Shot, Scallop Circle Bigz Die, Labels Collection Framelits, Holiday Ornament Framelits, 1/4" stitched Whisper White grosgrain ribbon, Stampin' Dimensionals


Below is my second project - a Christmas card, with a little surprise inside!  This is a quick & easy card to make when you want to give someone a gift card for the holidays.


Supplies used to make this card:
Stamp Sets: Merry Little Christmas, More Merry Messages
Card stock: Crumb Cake, Cherry Cobbler, Whisper White
Ink: Cherry Cobbler, Old Olive
Designer Series Paper: Season of Style
Other: Big Shot, Labels Collection Framelits, Perfect Polka Dots embossing folder, 1 1/4" circle punch, Stampin' Dimensionals

I hope you enjoyed my projects today.  Now I would like to give you a chance to win some Blog Candy!  Please leave a comment on this post by midnight on Monday, November 18. I will choose a winner at random to win a Season of Style Designer Series Paper Stack.  It is a stack of 48 sheets (4x6) of double-sided paper sized for card fronts.   I used some of the patterns to make today's projects!

Now hop along to Liz Haddon's blog to see her Christmas Creations.


Thanks for stopping by!
Kathy


Just in case you get lost along the way:
Dawn Duval http://www.shallwestamp.com/
Kathy Winter (that's me!) http://ladystampalot.blogspot.com/    YOU ARE HERE!!!
Liz Haddon http://www.stampwhisperer.com/
Martha Armstrong http://stamp4martha.typepad.com/my_weblog/


Thursday, November 14, 2013

The RED cards

 Here are two more cards that Jean and Patti did for HOMEWORK.   Last month I was starting to run out of green cards, so Patti and Jean chose the red cards.  Again, I just like my stampers to stamp, so they are free to make any kind of card, and hopefully they will use Stampin' Up!'s fabulous products.
Since my November club meetings are coming up this weekend, I will choose a winner using random.org

The winner is.................................


Debbie

Debbie, you get to choose one of the single wooden stamps that you have had your eye on for awhile!

Lyn, you won September's contest.  Hope you can make it to this month's meeting to claim your prize!


CONTACT ME if you would like more information about my stamp clubs.  You will have a great time and you can earn FREE Stampin' Up! merchandise.

Thanks for stopping by today!
Kathy

Wednesday, November 13, 2013

Oh, Christmas Trees!


Every month  I give my stamp club members HOMEWORK.   They like it so much that if I forget to assign it - someone will always ask me for it!  I give them each the same supplies and ask them to make a card to bring to next month's meeting.  I would like for them to use all the supplies I gave them in some way, and to use Stampin' Up! products.  But I am very lenient when it comes to the rules.  I just like for them to take the time to stamp in between our monthly meetings.  I choose a winner at random and she gets to pick something from my prize basket.  Everyone who brings a card to show can pick a smaller prize from my goody basket.

These are the "Green" cards that were brought to October's meetings.  The card above is Anna's card.  Love the non-traditional Christmas Tree!  What a fun way to use the Candy Dots.  Below is the inside of her card.


The card below is Debbie's card - outside, then inside:

The trees were from the same stamp set Anna used for her card.  It is a retired set - sorry, but I do not remember the name.  Debbie's card could easily be made using the ever popular set Lovely as a Tree...which is the set Lisa used to make her card below:


Lisa even stamped her envelope!

Stop back tomorrow to see the "RED" homework cards.

Thanks for stopping by today!
Kathy

Tuesday, November 12, 2013

Chalkboard Technique

This is the third project we made at October's stamp club meeting, using the Chalkboard Technique.  I have seen lots of cards like this on the Stampin' Up demonstrator website and wanted to try making one.  This would be a cute card for a teacher or to place on someone's desk for their birthday.  If you would like to make a card like this, CONTACT ME and I will forward directions to you.  Or better yet, gather your friends together (your place or mine) and I will teach you how to make this card.

November stamp club meetings are this weekend, so be sure to ask me how to join in the fun! GO TO MY STAMPIN' UP! WEBSITE for a list of dates/times and to RSVP.

Thanks for stopping by today!
Kathy

Monday, November 11, 2013

Halloween Flip Card

We made this flip card at my October stamp club meetings, using the new Circle Card Thinlits Die and the Big Shot.  This is a WOW! card that is super simple to make.  We adhered the Witches' Brew Designer Series Paper to the card stock first and cut both layers at the same time.  The die will cut and score the paper so all you do is fold!  We used the stamp set Halloween Hello to stamp the witch, greeting, and candlesticks (on the back of the moving section.)  We made the moon by making a stencil using a circle punch and a scrap of card stock and then sponging on the yellow (Summer Starfruit) ink right on top of the image of the witch.

 Below is the same card but with a different pattern of Witches'Brew Designer Series Paper.  I added some orange ink (Pumpkin Pie) to the moon and also sponged around the edges of the white card stock circle.

CONTACT ME for more information about my stamp clubs!

VISIT MY STAMPIN' UP! WEBSITE  to shop or to see a list of my stamping events.


Thanks for stopping by!
Kathy

Sunday, November 10, 2013

A Little Late!


I am getting ready for my November stamp club meetings and I realized I never posted the projects from October!  This is the 3D project we made - a cute candy box just the right size for a Reese's peanut butter cup (or a small bag of Skittles, M&Ms, etc.)  We made this project using the new envelope punch board.  What an awesome tool!  You can use it for much more than just making envelopes.  (Although you can make 66 different sizes of envelopes!)

We used Versamark Ink to stamp the candy images on the Pumpkin Pie card stock. This was one of my favorite products when I first started stamping and didn't have a lot of ink colors.  It is a clear ink that will show up just a shade darker than the paper you are stamping on.

CONTACT ME if you would like information about my stamp clubs.

CLICK HERE to shop from my Stampin' Up! website.  You can see the latest promotions and a schedule of my stamping events.

Thanks for stopping by!
Kathy