Friday, January 21, 2022

"Coloring" with Designer Series Paper

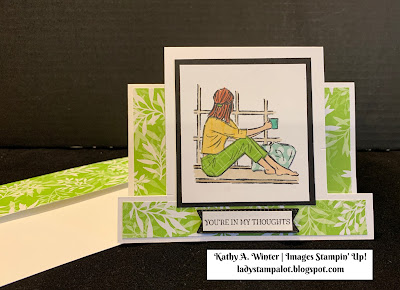
This is a set of cards that I made using the In The Moment stamp set from the Stampin' Up! Jan/June 2022 mini catalog.  I used the Paper Piercing technique to do some of the "coloring" on these images.

First, I stamped the image on a piece of Basic White card stock.  Then I stamped part of the image on different pieces of designer series paper.


I used my Paper Snips to cut out different parts of the image.


Then I glued those pieces to the image on the white card stock.


Finally, I finished coloring the image using my Stampin' Blends.  I also used paper piecing for her top - but I would suggest NOT using black paper the first time you try this technique.  It was very difficult to see the outlines of the stamped imagine when cutting it out.


Below is the final card.  It is really cute in real life!  Earlier this week, I posted a video that shows you how to cut and score the card stock to make this card.  You can see that video and details for making the card BY CLICKING HERE.  I also explain the paper piecing technique in that video.

Here is the same card, made using different Designer Paper.


Below are measurements for the other cards that I made.

 
Measurements for this card:
  • Basic White Thick card base 5-1/2 x 8-1/2
  • Patterned Paper strip 1-1/2 x 5-1/2
  • Basic White card stock for image 3 x 3
  • Black mat 3-1/4 x 3-1/4


Measurements for this card:
  • Basic White Thick card base 5-1/2 x 8-1/2
  • Patterned Paper strip 1-3/4  x 5-1/4
  • Basic White card stock for image 3 x 3
  • Black mat 3-1/4 x 3-1/4


Measurements for this card:
  • Basic White Thick card base 5-1/2 x 8-1/2
  • Patterned Paper 4 x 5
  • White card stock for image 4 x 4; cut along outside edge of image to fit on the front using photo as a guide
  • 2" Basic White card stock circle for stamped greeting

Below are the products I used to make the cards.  Click on any image for more information or to add the item to you shopping cart. 

If you have any questions about making these cards, please EMAIL ME.

Thanks for stopping by!
Kathy


Tuesday, January 18, 2022

Fun Fold SIde Step Card - video tutorial

Watch the video to see how to make a fun fold card.  I believe this is called a side step card.  I made this card using the stamp set, In The Moment, from the new Jan/June 2022 mini catalog from Stampin' Up! and the Friendly Hello Designer Paper from the Jan/Feb Sale-a-bration brochure.  It is not as hard to cut and score this card as you would think!  This card could be made for any occassion using almost any paper and stamp set.  I hope you will give this card a try!  Be sure to watch until the end of the video to see how I "paper pieced" her clothing - and to see several other cards I made using this stamp set.  (If you are viewing this in your email or on a mobile device  - you may need to click on the title to load the video.)


Here is the card that I made in the video.


Below is another version of the card, using different patterns of the "Friendly Hello"  Designer Paper.  As I mention in the video, her clothing is actually small pieces of patterned paper that I cut using my paper snips.  Any paper with a small pattern would work for this Paper Piecing technique, but I used designs from the 6x6 packs of Designer Series Paper from the annual catalog.  

After the paper pieces were glued down, I finished coloring the image using Stampin' Blends.


The photo below shows the measurements for making a card like mine.  You will have to watch the video to see how to cut and score the card base.  You can also take a screen shot of these pieces/measurements from the video.


Please do not hestitate to E-MAIL ME if you have any questions!  I am here to help!

If you are inspired to make a card like mine, I would love you to purchase the products from my online store.  Click on any image below to learn more about the products or to add it to your shopping cart or wish list!


Thanks for stopping by!
Kathy


Tuesday, January 11, 2022

Video Tutorial: Quick & Easy Valentine Cards


I have been having fun making Valentine cards using the Sweet Conversations stamp set, Sweet Heart Dies, Sweet Talk Designer Paper, and other products from the NEW Jan/June 2022 Mini Catalog from Stampin' Up!

In the video I show you how to make TWO Quick and Easy cards.  Plus I show you three ways to make cute Conversation Hearts to use on your projects.  Finally - if you watch until the end of the video. you will see 8 other projects that I made using these supplies.  (If you are viewing this in your email or on a mobile device  - you may need to click on the title to load the video.)

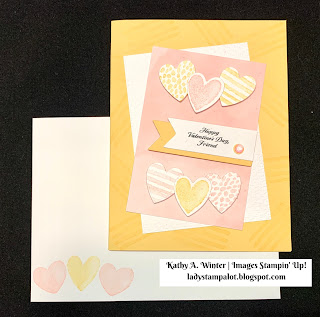
Below are the cards I featured in the video. In the video, I made the card on the left using a Basic White card base - instead of adhering the designer paper to a layer of white card stock.


Below are several of the cards that I showed at the end of the video.  

I posted basic directions for three of the cards ON THIS BLOG POST.

Directions:

  • Blushing Bride card stock base: 5 1-2 x 8 1-2; scored in half at 4-1/4
  • Three pieces of coordinating Designer Paper: 2 x 3-1/2, 2-1/2 x 3, 1-3/4 x 4-1/4
  • Blushing Bride circle, embossed using Gingham Embossing Folder
  • Real Red die cut envelope
  • Heart image die cut fromt the Sweet Talk Designer Paper
  • Basic White strip for greeting: 3/8 x 3; stamped in Real Red ink; add Iridescent Rhinestone Jewel
  • Red Ruffled ribbon; glued to the card front and edges trimmed even to the edges of the card front


Directions:
  • Pool Party card base: 5-1/2 x 8-1/2
  • Basic White Layer: 3-7/8 x 5-1/8
  • Designer Paper: 2-1/2 x 5
  • Blushing Bride card stock: 1-1/4 x 5; embossed with Dotty Hearts Embossing folder
  • 3/8" Real Red Faux Linen Ribbon
  • Glue the DSP and embossed card stock to the white card stock; then wrap ribbon around that layer and tie a knot; secure with a glue dot, if needed
  • Attach layer to card front
  • Pool Party die cut tag
  • Smallest layering scalloped circle die
  • White Baker's Twine


Directions:
  • Granny Apple Green card stock base: 5-1/2 x 8-1/2
  • Designer Paper layer: 5 x 3-3/4
  • Granny Apple Green die cut banner
  • Real Red tiny die cut banner
  • Granny Apple Green die cut label
  • Pink Supple Shimmer Specialty Paper die cut hearts


Directions:
  • So Saffron card stock base: 5-1/2 x 8-1/2
  • Basic White layer: 3 x 4-1/4; embossed using Tasteful Textile embossing folder
  • Blushing Bride layer: 2-3/4 x 4
  • Whisper White die cut hearts (6) stamped with striped and dotty images 
  • So Saffron and Basic White die cut banners - stamped with greeting and embellished with Iridescent Rhinestone Jewel

You can see the directions for the other three cards in the video ON THIS BLOG POST.

Below are some of the products that I used to make the Valentine cards.  Click on any image for more information or to add it to your wish list or shopping cart.

If you have any questions, please CONTACT ME.

Thanks for stopping by!
Kathy