Showing posts with label 3D. Show all posts

Thursday, December 11, 2025

2 Weeks Until Christmas


There are only TWO weeks left until Christmas!  How did that happen?!  There are still great deals to be had - but the guaranteed shipping date has passed for Christmas delivery (from Stampin' Up!)   

Please check out all the specials in my online store including LAST CHANCE ITEMS.  If you spend $75 on a single order (now through Dec 12) you will get FREE SHIPPING.

PLUS you will earn the opportunity to buy the PRODUCT OF THE MONTH for December for just $5, if you haven't already purchased it.

Hopefully, your Christmas cards are made and in the mail - or if you're like me you  are furiously finishing them up!

I thought I'd share a cute project - that would make a nice little stocking stuffer - or small thank you gift.  Watch the video below to see how to make these Post-it Note holders.  I made quite a few of these this summer - to give to my friends at the Stampin' Up! Convention.


Here is one similiar to the one I made in the video.


Here is another one that I made - and you can see the inside as well.


Please contact me if you have any questions!


Shop my online store here:

https://kathywinter.stampinup.net/

Follow me on Face Book:

https://www.facebook.com/ladystampalot

Join my Facebook Group:

https://www.facebook.com/groups/907793999735887

Follow me on Pinterest:

https://www.pinterest.com/karwinter/

Follow me on You Tube:

https://www.youtube.com/@ladystampalot1

Thanks for stopping by!

Kathy


Friday, October 16, 2020

Christmas Countdown

Can you believe that it will be Christmas in only 10 short weeks!  I had to check my calendar twice to make sure I had that right!  So for the next 10 Fridays - I will be helping you find just the perfect gifts for the people on your shopping list.  Today, it is the CHRISTMAS COUNTDOWN PROJECT KIT.


This is a great kit for you to buy now, make with your family, then use it to count down the days until Christmas during the month of December.  The 25 boxes are approximately 2x2x2 inches - and can be filled with little treats or other small goodies.  The contents of the kit are shown below - all you need to complete this project is adhesive!


Below is the same kit - made using one sheet from TRIMMING THE TOWN Designer Series Paper. What a cute home decor project this is!  You could put small paper strips inside each box- with a fun family activity to do each day.  Or try putting a joke or riddle in each box.  Or even a household chore that needs to be completed before the holidays arrive!  So many ideas......


You could use this project kit to make a countdown for any special occasion including birthdays, weddings, or any holiday - including Halloween.


Here's another way to use this project kit - as storage for small items including jewerely or other small items that don't currently have a place of their own.  You could cover the front of the boxes  with any patterned paper to match your home decor.  The box below was decorated using the IN GOOD TASTE Designer Series Paper, which is currently on sale during the month of October 2020.


What a fun project this would be for just about anyone on your list.  The front and back of the boxes can both be decorated - and double the use of this kit!  CLICK HERE NOW to add this kit to your shopping bag!


CONTACT ME if you have any questions!

Please follow my FACEBOOK PAGEPINTEREST BOARDS, and YOU TUBE channel so you won't miss a thing!

CLICK HERE to see and RSVP to my October events.


Thanks for stopping by!
Kathy


Monday, August 17, 2020

Easy Treat Box

I'm back with a new video for you.  Watch to see how easy it is to make this cute Tall & Skinny treat  box.  It uses just one sheet of 6x6 patterned paper.  As you might be able to tell - I made these boxes using the 2019 - 2021 In Color Designer Series Paper Assortment.  The patterns are a little different in the current Annual Catalog - but the paper is available in all of the Stampin' Up! color assortments.

I always like to put candy in my treat boxes, but these could hold a small hand sanitizer, lip stick, etc.  The box is 6 inches tall, 2 inches wide, and 3/4 inch deep.


Supplies used to make the box:

  • 6x6 piece of Designer Series Paper
  • 2x3 piece of coordinating card stock
  • Linen thread, Baker’s twine, or narrow ribbon
  • Tag Topper punch
  • Adhesive (something strong enough to hold the box together)
  • Stamps/ink/punches of your choice to decorate (I used Daisy Lane stamp set and Medium Daisy punch)


Basic  Directions:

  • Score the Designer Series Paper at 2, 2 ¾ , 4 ¾ , 5 ½   Turn and score at ¾

  • Fold along all score lines; cut from the bottom along all score lines - up to the other score line; cut away the smallest flap

  • Add adhesive to the RIGHT SIDE of the box along the narrow flap and along the bottom  flap that is the farthest away; adhere the box together.  (It will not matter if your scoring resulted in the smallest flap being on the opposite side as the one in the photo.)

  • Lightly pinch the top of the box together

  • Score the 2x3 piece of card stock in half at 1 ½  and punch one of the 2” ends using a Tag Topper punch

  • Glue the card stock piece to the top of the box and having the punched end flap over the opening of the box.

  • Thread ribbon or twine through the opening in flap and around the box and tie in a bow on the front of the box.

  • Decorate box as desired.


I also have a PDF tutorial for this project.  Just EMAIL ME if you would like a copy, or leave a message below.


Thanks for stopping by!
Kathy

Please follow my FACEBOOK PAGEPINTEREST BOARDS, and YOU TUBE channel 

Sign up for my news letter here:

Subscribe

* indicates required

/ ( mm / dd )

Friday, April 1, 2016

Craft-it UP!

I am so excited to be teaching classes for Chesapeake City Parks & Rec.  This is one of the projects we will be making in a special Craft-it UP! series of classes, designed for you to make for that special someone for Mother's Day.   It is an 8x8 framed piece, made using retired designer series paper from Stampin' Up! and lots of Stampin' Up! punches.  There is a little stamping in there, too.

Everyone will also make a card, and depending on the age and skill level of the participants, I may throw in an extra bonus  project, too.  You can get more information about my classes BY CLICKING HERE  

I will be teaching the Craft-it UP! classes on Saturdays April 9-23 for the above projects and May 14-28 for the Father's Day project.

I will also be teaching Scrapbooking classes, Tuesday afternoons April 5-19 and May 3-17.

Finally, I will be teaching Card Making classes Friday mornings, June 3-17 and July 8-22.

All classes are offered over the course of 3 weeks for only $26.

CLICK HERE to register for any or all of these classes. Non-Chesapeake residents are able to register for an additional $5 fee.  Hope to see you at one or more of these classes.

Thanks for stopping by!
Kathy


Wednesday, September 2, 2015

Get a Jump on Your Jingle!

Saturday September 26
10 am - 4 pm
Hope Lutheran Church, Virginia Beach


Stamp a Stack of cards
Make these beautiful Christmas cards to send to your friends and family!  Your fee will include all the supplies needed to complete the cards that YOU CHOOSE to make.  Other card designs will be available. 
Make 6 cards for $10 or 12 cards for $20
Please bring your favorite adhesive or purchase at the event.


Create a Beautiful Wreath
The price for this special class includes all the supplies needed to make this beautiful wreath.  In addition, you will make 3 extra/interchangeable banners suitable for Halloween, Fall, and Patriotic holidays.  Coordinating ribbon is also included.   Class fee: $35  YOU MUST PREPAY FOR THIS CLASS BY SEPTEMBER 12. Bring a low temperature glue gun if you have one.


Barry’s Creative Class
No picture available yet – but if you have taken one of Barry’s classes in the past, you know you are in for a special treat.  Price for this special class includes a stamp set, paper, and embellishments to complete the project with lots left over to make more at home!  Check back for more details.  YOU MUST PREPAY FOR THIS CLASS BY SEPTEMBER 12.  Class fee: $35


Please CONTACT ME for more information or to register.

Thanks for stopping by!
Kathy

Tuesday, July 21, 2015

July Stamp Club Card #1

This was the first card we made at my July stamp club classes.  It is called a Cascading Card.  I watched several videos on You Tube, then used the best ideas from each of them to share with my club members.  The only challenging part of this card is being careful to measure and cut accurately.  Everyone agreed that using Stampin' Up!'s Stampin' Trimmer made things a whole lot easier!  But I guarantee you that no one who receives this cute card will even notice if the cuts are not perfect!

We used Stampin' Up! 12x12 card stock from the Brights collection.  The candles were made using Designer Series Paper from the Brights DSP Stack.  The flame is punched from the bird builder punch - it's the bird's wing!

Below is how we finished the back of the card.  (This is a retired greeting - but was a cute fit for this card!)
Club members who made this card - please leave a comment to tell me what you thought of this card.  Will you make another one?  Will you give the one you made away?! 

Other comments are also welcomed!

I am sending a card like this to two friends who have a birthday this month.  I hope they enjoy it!

Club members: the current hostess code is 7MAZH4DM

Thanks for stopping by today!
Kathy

Saturday, July 18, 2015

July Stamp Club Projects

These were the projects we made at my July Stamp Club classes.  They were all birthday themed - because my birthday is in July.  In fact, it is TODAY!!   I will be celebrating by stamping with my friends - at my 3rd Annual Birthday Bash!  Check back next week to get details about each of these cards and to see the fabulous birthday cards my club members made for me!

Thanks for stopping by!
Kathy

Friday, July 11, 2014

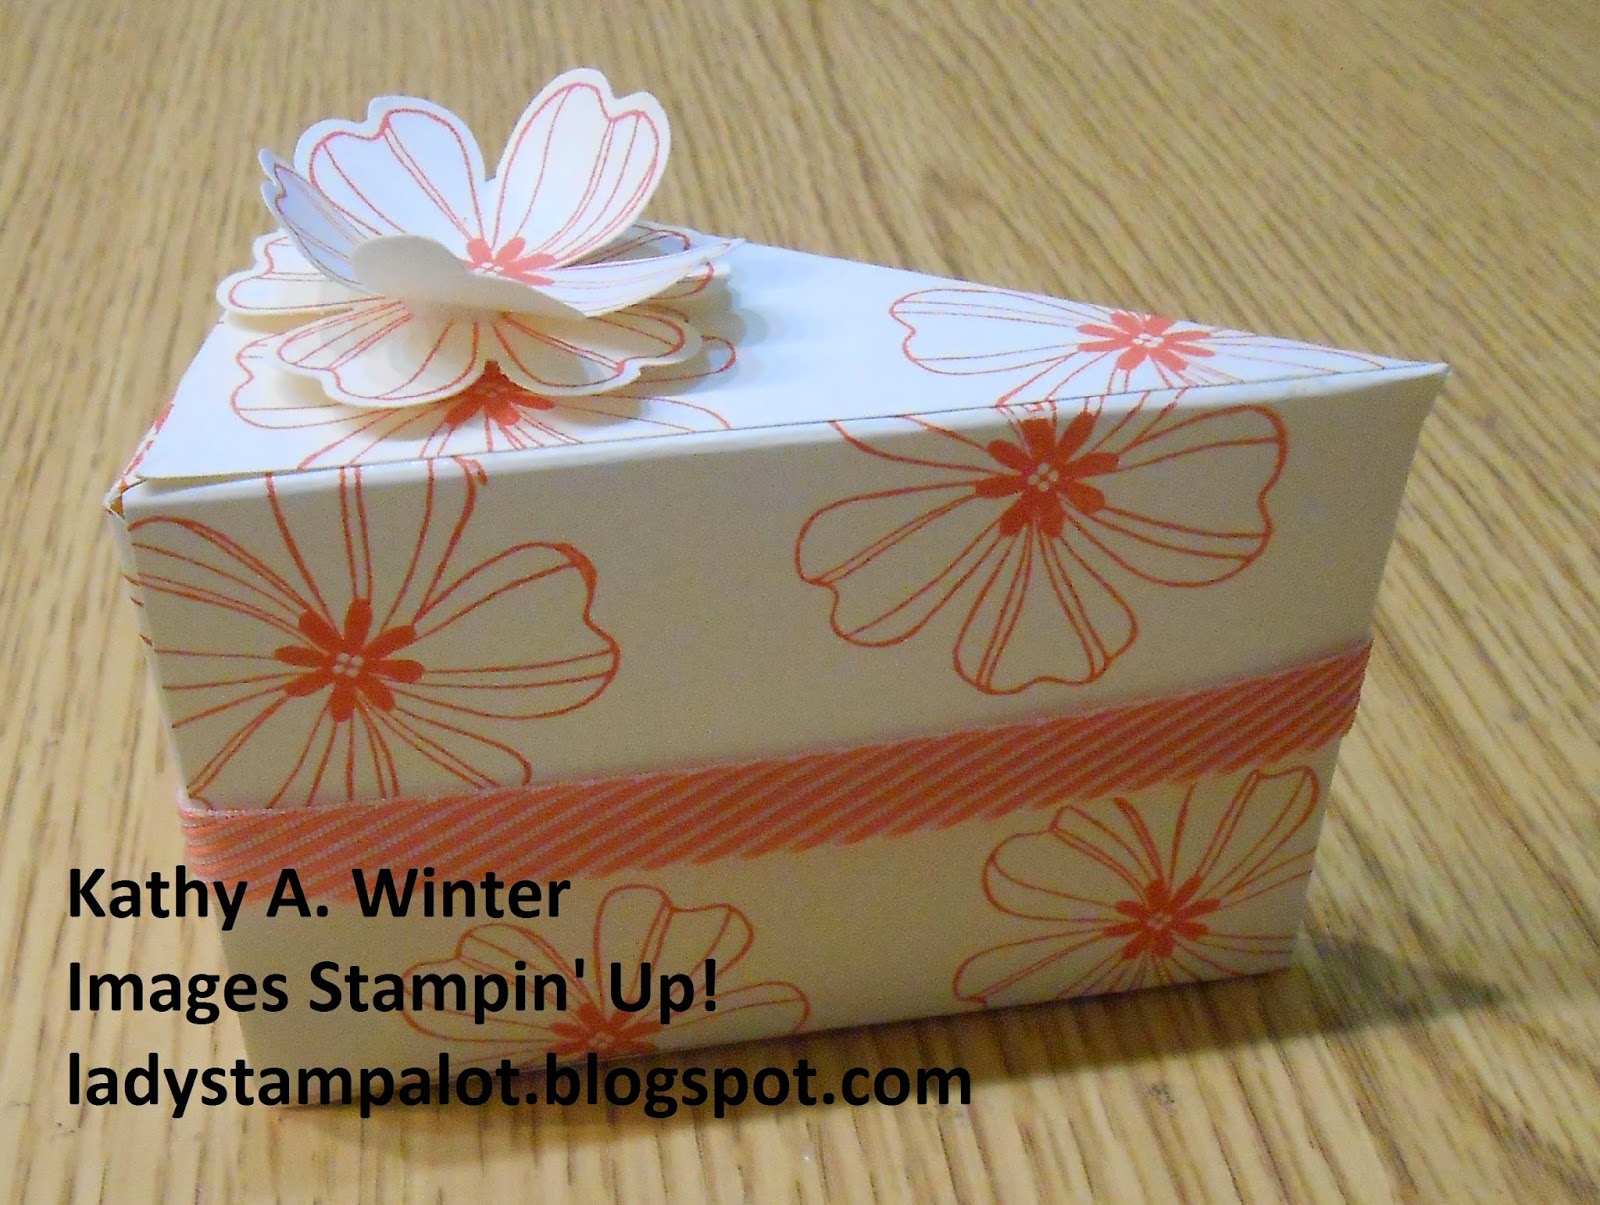
Cute Cake Box

My stamp club meetings are happening this weekend and this is the first project we will be making.
It is a cute box, in the shape of a piece of cake.  I think the ribbon around the middle looks like a layer of frosting.  It is attached loosely and slides off so that you can open the back of the box and get to whatever goodies you decide to put inside.  Here is what the box looks like when it is open.

I had to try making a box like this after viewing THIS YOU TUBE VIDEO.

CONTACT ME to learn how YOU can get in on the fun and make a cute project like this.

CLICK HERE  to see my calendar of events and to shop 24/7.  Lot of new items have been added to the CLEARANCE RACK.  You can see the Weekly Deals by CLICKING HERE

If you choose to place an order online, please use the hostess code: P9FMY2VZ (Code is valid through Sunday July 13, 2014.)
Thanks for stopping by!
Kathy