Showing posts with label Snow Time dies. Show all posts

Tuesday, October 12, 2021

Stamparatus Tip


In this video, I show you how I stamped several die cut images quickly and with a perfect edge surrounding the image! 

(If you are viewing this in your email or on a mobile device  - you may need to click on the title to load the video.)

I needed to make 10 cards for a card SWAP that I am participating in with other Stampin' Up! demonstrators.  Here are the finished cards.  They are a little bit different from the one I showed in the video.


Basic Directions for making this card:

Mint Macaron card base: 5-1/2 x 8-1/2
Basic White layer: 4 x 5-1/4
Top piece of designer paper: 2-1/2 x 5
Bottom piece of designer paper: 1-1/4 x 5

Glue the two pieces of designer paper to the Basic White layer, leaving a 1/8" border all around.  Wrap ribbon around the card where the two pieces of designer paper meet - and tie a knot.  Adhere the layer to the card front.  Attach the snowman die cut piece to the card using Stampin' Dimensionals.


The card below does not have the Basic White layer.  The designer paper layers are 2-5/8 x 5-1/4 (top) and 1-1/4 x 5-1/4 (bottom.)  I did not use ribbon on this card.


The card below uses the same layers/pieces as the first card - but I tied a bow in the ribbon (vs a knot) and I did not attach a snowman to the card.

If you have any questions about how to make the cards, please do not hesitate to CONTACT ME.

CLICK HERE  to see 12 more cards that I made using the Snow Wonder stamp set.  I made these cards last Christmas - so some of the products are retired and no longer available.  But I hope they show you how versitile this stamp set and dies can be!

Thanks for stopping by!

Kathy

Friday, December 25, 2020

Merry Christmas 2020


This year I made 12 card designs using the Snow Wonder stamp set. and Snow Time dies. Most of the cards were inspired by cards I saw on Pinterest.  I just love this set so much - and I am thrilled that it is carrying over to next year's July - December mini catalog!  It is still available now - and if you order before January 5, you will get  10% savings on the bundle.

Below are the other cards that I made using this stamp set and dies.


The card above is called a Double Z fold card.  I have a tutorial showing you how easy it is to make a card like this.  CLICK HERE to see that video.


This card was made with a fun heat embossed snow background.  CLICK HERE to see a video for this card.


I have a FREE written tutorial with measurements and basic directions for making all of these cards.
It is my Christmas gift for you!  Just EMAIL me to request a copy.

I hope you will enjoy a peacful Christmas today!

Join me on December 27 for a fun countdown to the New Year and the NEW Stampin' Up! mini catalog!  CLICK HERE to get a sneak peek at what is coming!

Thanks for stopping by!
Kathy


Monday, November 30, 2020

Snow Wonder #5 - embossed snowfall

Here's another video showing you how to make a cute card using the Snow Wonder bundle from Stampin' Up!  This card has an emossed background of snow.  I always thought that getting out the embossing powder and heat tool was a lot of work for making a card......but this one is quite easy to make and it has that WOW factor that is sure to impress your friends and family.


Basic Directions for making this card:
  • Real Red card base: 8-1/2 x 5-1/2; scored at 4-1/4
  • Heartwarming Hugs DSP: 4 x 5-1/4
  • Real Red mat: 3 x 4-1/4
  • Basic Black card stock: 2-3/4 x 4
  • Press Versamark ink pad all over the black card stock piece; sprinkle a small amount of white embossing powder over card stock and heat embosss for a snowy night sky look
  • Attach paper layers to card front using Stampin' Seal
  • Stamp snowman on Whisper White with Memento ink and color with Stampin' Blends; attach to embossed black card stock using Dimensionals
  • Stamp greeting on Whisper White using ink to match the DSP; then cut out label using Snow Time dies; attach to the bottom of the card front using Dimensionals.
  • Whisper White for inside of card: 4 x 5-1/4


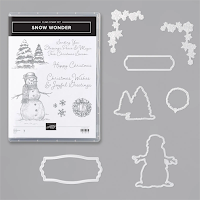
You can purchase the stamp set and dies as a bundle to save 10%.  Click on the photo for more information and to add the item to your shopping bag or wish list.

You can also purchase the stamp sets separately.  Click on the images for more details and to add the item to your shopping bag or wish list.


These products are in the August - December 2020 mini catalog.  If you like what you see - order now before they retire!


I have videos showing how to make the cards below using this stamp set. Click on the photo to see the video for that card.


If you missed the 12 cards that I made with this stamp set  CLICK HERE to see a video of them all - with a few details about each one.


CONTACT ME if you have any questions or if you need help purchasing supplies to make any of these cards.


Please follow my FACEBOOK PAGE, PINTEREST BOARDS, and YOU TUBE channel so you won't miss a thing!


Thanks for stopping by!
Kathy


·  

Monday, November 16, 2020

Snow Wonder Double Z fold card - video tutorial


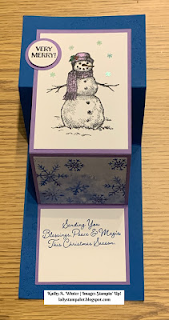
Here is another card that I made using the Snow Wonder stamp set.  I love this stamp set so much - that I made 12 different cards with it - most inspired by Pinterest.  This card is a Double Z fold card.  It is actually easy to make - watch the video below to see for yourself!  Watch until the end to see the 11 other cards that I made using this stamps set. (If you are viewing this in your email - you may need to click on the title to load the video.)


Basic Measurements for this card:
  • Pacific Point card base: 4-1/4 x 11; scored at 2-3/4 and 5-1/2 
  • Highland Heather layer: 3-1/4 x 10; scored at 2-3/4 and 5-1/2
  • Whisper White for stamping Snowman: 3 x 4-1/4 
  • Whisper White and Patterned Paper for inside card (you will one of each): 3 x 2 1/2 
  • "Very Merry" label is made using 1 and 1 1/4 inch circle punches


Some of the supplies needed to make this card are pictured below.  Click on any image for additional information about the product and to add it to your shopping bag in my online store.


I have videos showing how to make two more cards with this set. Click on the photo to see the video for that card.


CONTACT ME if you have any questions!

Please follow my FACEBOOK PAGE, PINTEREST BOARDS, and YOU TUBE channel so you won't miss a thing!


Thanks for stopping by!
Kathy